Thursday, July 31, 2014
Wednesday, July 30, 2014
New Card - Girl by the Sea
Believe it or not I have been working on this card for about 3 weeks...when ever I had a minute or two. One of my favorite designers is Nancy Border Dynes as she does a style that I just love. You can see her work at http://mytatteredtreasures.blogspot.com. This is similar to a card she made.
I found this adorable image on Pinterest which I edited in Photoshop. I placed the image on paper after running the edges through my distresser and stitched the edges with my sewing machine. I used Maja papers from Funky Junky, used brush corduroy to distress the edges, sprayed with water, and crumbled them. I let the papers dry over night and the next morning I attached the image to a layer of the crumbled paper.
I made the flowers from crepe paper, colored some beaded stamens with Dylusions spray and used Scattered Straw reinkers on the layers of crepe paper for color.
The swirl and leaves are Magnolia dies and the lace sticking out on each side is a Tim Holtz Die.
I also added some cheese cloth for interest after coloring it with Scattered Straw Reinker.
You can purchase all the dies and inks I used from Terri at Joan's Gardens.
Saturday, July 26, 2014
Thursday, July 24, 2014
Meet Whiskers V
This is our new puppy....Whiskers the 5th. We pick him up next week and the puppy fun begins.
Oh how we dread the training of a new puppy, but we are so excited to get him. If you compare the pictures below you will see he looks exactly like Whiskers IV did when he was this age.
We fell in love with him immediately as he came running right to us and jumped around playing with his toy, chewing on Jon's fingers and my toes.
We went back to the place that we got Whiskers IV, because they are such a great kennel.
The "peoplelise" their puppies from the start. They have teenagers come in daily to play with them. They take them out in the grass to play and teach them to lay on their backs and not be afraid. They were not expecting us and he was so clean, fluffy and smelled good.
We feel God blessed us as this little guy is 8 weeks old, is being weaned this week, has had his shots and will be ready to be the new member of the Fricker household next week.
Forgive the blurry picture but he just wouldn't stand still long enough to get a good picture! :)
Tuesday, July 22, 2014
Whiskers..our buddy!!!
Yesterday was a very sad and hard day for us and not much better today.
Our buddy, Whiskers has been such a faithful and good dog for 9 years.
We picked him out when he was 2 weeks old, visited him every 2 weeks until we could get him at 8 weeks. The first 6 months was the fun times of training a puppy and at times I wasn't sure "I" would make it. But, all that time was so well worth it as he was one of the best behaved dogs we could have found.
He has not been himself for several months. In May the Vet said he had 2 bad teeth, so he pulled them thinking that was his problem. He didn't get better and in fact worse. We changed vets and the new vet discovered he had a bad infection somewhere. After numerous visits, tests and medicine he just kept getting worse. The vet suggested we take him to Fort Wayne to the Emergency Veterinary Hospital to get a Cat Scan. Sunday we were so hopeful as he had the best day he had had in several weeks. But, yesterday morning he took a dramatic change for the worse (the vet thinks the cancer hit his brain). After the cat scan we were told he had a tumor in his nasal passage and it had spread to the brain. Certainly not the news we wanted to hear. We brought him home with pain meds, but on the way home we decided we just couldn't put him through any more pain. We stopped at our vet and was with him when she put him to sleep. Our hearts are broken. Everything we did he was always right beside us whether it was working in the garden, sitting by the pond or even watching TV.
We are going to miss him and he will always have a place in our hearts.
Our buddy Whiskers!
Whiskers the 4th at 8 weeks
He was Jon's 4th Westie
4 Months Old
Whiskers - a grown puppy
We are dog people and will soon be looking for another Westie.
We feel this honors the previous dog to want another one just like him.
Sunday, July 20, 2014
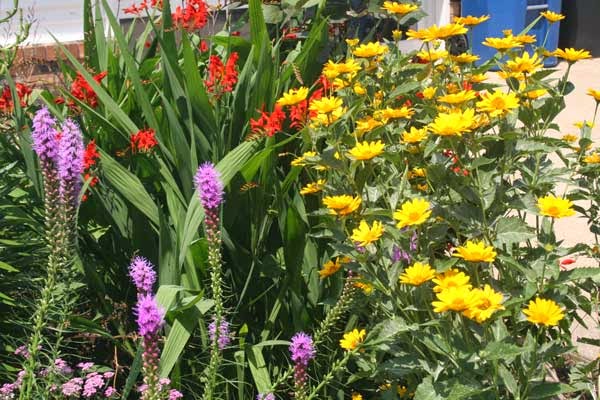
Lucifer (Crocosmia crocosmiiflora)
Lucifer (Crocosmia crocosmiiflora_ is a bulb which multiplies nicely and is a beautiful display
of red flowers that blooms late July into August. The foliage looks like iris.
My daughter (Lori) gave this plant to me many years ago. I have moved it several times,
but finally found the spot it loves.
A close up picture.
The purple flower is Liatris (spicata) with Lucifer in the background in another garden spot.
The yellow daisy like flower goes nicely with both of them.
My Strawberry Vanilla Hydrangea (Hydrangea paniculata 'Renhy')
is just starting to bloom. This is an amazing plant as it starts out
white, turns pink, then vanilla. It dries beautifully. I do believe it is
one of my very favorite plants and I would love to have several more.
If you want to see them in full bloom, search Pinterest for Strawberry Vanilla Hydrangea
and you will want one too.
Thursday, July 17, 2014
Bleydn - chosen for All Star Team
Bleydn is one of our Great-Grandsons and he was chosen for an All Star Baseball Team.
He is 7 and a catcher. They won all the games except for the last one which ended up 23-20.
We are so proud of him and his game was so fun to watch. It is amazing what those little guys can do. I can't imagine how good they are going to be when they reach high school, because they are sure good (in my eyes) now. Isn't he adorable?
Wednesday, July 16, 2014
Blueberry Pie - Yummy
I am not especially fond of normal blue berry pies because of the cooked blueberries. But a few years ago, I developed this recipe and love it. It is so easy to make too.
JOAN'S BLUEBERRY PIE
CRUST
1 1/2 cup flour
2 T sugar
1/2 t. salt
1/2 cup plus 2 T oil
2 T Milk
Press into pie shell and bake at 425 until slightly brown
FILLING
FILLING
1 C Blueberries
3/4 cup sugar
1/4 cup corn starch
1/4 t salt
Mix these 3 ingredients together
before adding
1 cup hot water
1 t lemon juice
add blueberries and water
Cook these ingredients together until thick, stirring constantly
Fresh Blueberries
3 1/2 cups raw blue berries.
Add these to thicken mixture after it has slightly cooked and stir
well. Add to baked pie shell
CRUMB TOPPING
CRUMB TOPPING
1 cup sugar
1 1/2 cup flour
1/2 cup soften butter
mix until crumbly. DO NOT use mixer.
Cover the blueberries in pie shell with crumbs and bake at 425 until brown...about 15 minutes.
If edges of pie shell start to get too brown, cover with foil.
If you decide to try this recipe, I hope you enjoy it as much as my family does!
Tuesday, July 15, 2014
Beets
Canning season for me has started. I have already frozen Strawberry Jam and several pints of Strawberries. But, soon I will be in full force as the corn and beans will be ready.
Saturday, I canned 7 pints of pickled beets. I was a little nervous about doing so, as I had not
done any without my Mom. I was pretty intent of writing good instructions over the years, but a fear of panic was upon me as I couldn't find my book with my instructions. I searched and searched and
finally gave into the internet. But, I was not happy with what I was finding, so kept searching.
Then, the Lord blessed me with a flash of memory and I found it in a drawer that I haven't been able to use because I put a freezer over it and I can only pull it out part way. I was able to reach my hand into it and I found my precious book with Mom's detailed instructions.
MOM'S PICKLED BEETS
PICKLING SALT
2 QUART VINEGAR
2 QUARTS SUGAR
1 BOX PICKLING SPICES IN A BAG
BEETS
REMOVE ALL THE LEAVES, BUT DO NOT CUT OFF THE ENDS AS THEY WILL BLEED.
WASH BEETS EXTREMLY WELL...REALLY SCRUB THEM OUTSIDE TO REMOVED MOST OF THE DIRT. THEN WASH AGAIN IN THE SINK MAKING SURE THRE IS NO DIRT LEFTON THEM OR IN THE ENDS.
COVER WITH WATER AND ADD ABOUT A CUP OF PICKELING SALT. COOK UNTILYOU
CAN EASILY PUT A KNIFE THROUGH THEM.I LIKE TO COOK THEM THE DAY BEFORE SO THEY ARE EASIER TO PEEL
ONCE COOLED, CUT OFF BOTH ENDS AND SLIP OFF THE SKIN MAKING SURE ALL OUTER LAYERS ARE REMOVED. STRAIN THE BEET WATER AS THIS IS WHAT TO USE FOR THE BEET WATER.
ADD THE VINEGAR, SUGAR AND BAG OF SPICES TO THIS BEET WATER.
BRING TO A BOIL STIRRING WELL TO DISSOLVE ALL THE SUGAR. CUT UP THE BEETS IN BITE SIZE PIECES AND ADD TO THE BOILING BEET WATER.
BRING THE BEETS TO A BOIL AND KEEP WARM.
PUT JARS IN PAN AND BRING TO A BOIL TO STERILIZE, ADD LID TO THIS PAN OF WATER JUST
BEFORE YOU ARE READY TO PUT ON THE JAR. ADD BEETS TO JAR, MAKING SURETHEY ARE COVERED WITH BEET JUICE.. ADD LID AND SCREW RING ONTO THE JAR..
COVER WITH TOWEL AND MAKE SURE AFTER THEY HAVE COOLED THAT THE LIDS ARE SEALED.
Sunday, July 13, 2014
Card Box Tutorial
Several have commented and emailed me that they would like to have directions on making the 12x12 Card Box. Please let me know if you have any questions. Scroll down below this tutorial to see the box.
I used plain paper for this tutorial, but the box is so much prettier using double side paper.
I really love the Anna Griffin paper as it doesn't crack when scored.
First of all. cut a 12x12 paper to 8.5 x 12.
Lay the 8.5x12 paper on your score board and score at
2.75 - 5.5 - 8.25 - 11
Cut off 2 inches of the paper that has been scored. The nice thing about having had scored it, the score lines are perfect for the supports later.
Put the paper back on the score board and then rotate the paper 90° so the unscored side is at the top and score at 3.75
Cut 4 strips of the shortest score lines stopping at the 3.75 score line.
Make sure you stop at 3.75 inches deep.
At the 11 inch score line make an angle cut and cut off the shortest piece as shown above.
Add double sided tape to the tab which holds the box together.
Fold at all the score lines. This is how the box looks before taping it together.
Attach the Double Sided Tape to the inside of the box.
Now fold the box shut in both directions to make sure your box folds flat.
Lay box flat, both directions.
Using the 2 inch strip cut off earlier, place on the score board making sure the scored edges match the earlier score lines. Score at 1.75, 6.75, 7.25 . Now cut on these new score lines.
You will be left 2 strips
Fold back these tabs on both ends, applying glue on both ends, both ends.
Slip down into the box for additional support and also a place to add the embellishments.
By the way, I added the embellishments to a strip of clear acrylic that I cut out of Spellbinders packaging. This allows them to wave in the air when the box is opened.
Saturday, July 12, 2014
CARD BOX
I have had several requests for directions for the 12x12 card box.
I am working on that today and hopefully tomorrow will get it posted.
One of the big rages right now is the Card Box that folds flat to mail it. I have made 3 of them for birthdays. (the other 2 I sent to my grandchildren and didn't take a picture)
Last night we attended a surprise birthday party for one of my best friends, Sherry. I had taken a class in Florida to learn how to make this and hadn't used the paper that was included in the class kit.
It is a Anna Griffin Paper and I think has been discontinued, but oh how I love it.
I fussy cut a fairy that I also found in Florida and used the Exotic Butterflies from Cheery Lynn
DL113. Also used the Swirl and leaves from Magnolia. I wish you could see the beauty of this box in real life. If you haven't made any of them yet, there are all kinds of samples, instructions on Pinterest and Youtube. Or email me and I can give you the score line you need to use to make this out of a 12x12 paper. The hardest part of the box is getting the embellishments (butterflies) placed so that they are balanced and in the right places. I cut plastic strips out of spellbinder packaging as they are clear and you don't see them.
The bottom of the box.
Folds Flat for mailing.
Tuesday, July 8, 2014
And the Winner is~~~
You can see all last weeks challenge entries by clicking here!
This week's winner was chosen by a random drawing and
Judy is the winner.
Congratulations Judy!!!
Thanks to those of you who joined us for last week's challenge. We had some beautiful cards
made for this challenge. Be sure to check them out.
I will be sending Judy a badge for her web site and Terri will be sending a gift from Joan's Gardens.
You can see Judy's pretty card by clicking here! Be sure to leave Judy a comment. She did a great job creating so much interest with all the circles.
Random Integer Generator
Here are your random numbers:
11
Timestamp: 2014-07-08 12:06:16 UTC
Monday, July 7, 2014
Challenge Vacation Card
Everyone seems to be so busy right now, including me. We have not had very many entries for the last few challenges, so I am going do things a little different the next few weeks.
I am going to leave this link open and you can find it at the top of the page under Challenges. When you make a card you can post it and anything goes. Just feel free to post your cards or projects (even gardening or recipes) anytime you have something you would like for everyone to see.
I will do the same and hopefully everyone can enjoy each other's projects. Terri will not be sending any gifts during this time. So gals, lets have fun and post away. Enjoy your summer!!!!
I used my Dream Weavers stencil again and colored it with their the acrylic paints. I have fallen in love with stenciling!!! The rectangle spellbinder Gold Rectangle One S411 was cut out and but this time I debossed instead of emboss it.. My friend Judy gave me this adorable Red Poppy Faerie stamp by JustRite and I thought it went great with my flower. My only negative is I wish she was turned the other way. I feel she needs to be looking at the flower instead of away from it. Maybe that is because of my years as an interior decorator that it bothers me. But. I already had the flower and the rectangle done when I decided to use her. She was colored with Distressed Inks and I wanted to keep the same color theme, so a select few colors were chosen. The Love Sentiment by Cheery Lynn and the curved borders by Spellbinders finished off the card
I was about done and I smeared Tattered Rose Ink on the card. Have you ever done that? Made me so mad, but I wasn't about to start over. So, I took a terry cloth towel, lightly inked it with Tattered Rose and sorta stippled all over the card. I loved it when I finished, so that is I how made lemonade out of a lemon!! What do you think?
Sunday, July 6, 2014
4th of July Party
Jon and I love to entertain guests in our home. I love all the small details of planning the party and coming up with a theme etc. And, Pinterest makes it so easy these days. The only problem is that I need to start a month early to use the many ideas I find. I searched for 4th of July Party and wow how fun.
I printed out the 4th of July labels for our water bottles, painted my ice bucket white and covered it with red, white and blue card stock which I printed after finding it on Etsy. I used the same paper to make pinwheels to stick in my flower pots. We have a new Joann's fabric store on the south end of South Bend and it is wonderful. I found this flannel backed fabric to make table cloths and a couple decorations on sale. I wanted red, white and blue flower arrangements and was limited on red flowers. So, I added red food coloring to water in mason jars for the red and used white lilies and blue larkspur to complete my arrangement.
We invited 8 couples from church, each brought a yummy dish and I grilled honey orange chicken, made corn bread salad, lavender lemonade and a dish of sour creamed onions and cucumbers. Everything was delicious. God blessed us with a gorgeous evening and a good time was had by all.
I printed out the 4th of July labels for our water bottles, painted my ice bucket white and covered it with red, white and blue card stock which I printed after finding it on Etsy. I used the same paper to make pinwheels to stick in my flower pots. We have a new Joann's fabric store on the south end of South Bend and it is wonderful. I found this flannel backed fabric to make table cloths and a couple decorations on sale. I wanted red, white and blue flower arrangements and was limited on red flowers. So, I added red food coloring to water in mason jars for the red and used white lilies and blue larkspur to complete my arrangement.
We invited 8 couples from church, each brought a yummy dish and I grilled honey orange chicken, made corn bread salad, lavender lemonade and a dish of sour creamed onions and cucumbers. Everything was delicious. God blessed us with a gorgeous evening and a good time was had by all.
Thursday, July 3, 2014
Subscriber Challenge
I am happy to announce the winners of the Subscriber Challenger I did a few weeks ago.
And the winners are: Barb Macaskill and Jessica Shelton-Buffa. Congratulations to both of you.
Please send me your mailing address to jfricker@fourway.net so that I can get your gifts sent off to you the first of next week. Again, thanks so much for subscribing to my blog!!!
Wednesday, July 2, 2014
I love my gardens this time of year!
We were so blessed yesterday not to have any storm damage. Lots of trees down all over, 2 people killed and much damage. Our power came back on about 8:00 PM last night and we were so thankful. They are saying some won't have it until Saturday. We do have a generator, so we were able to keep our freezers and water going.
I love this time of year. The flowers are at their peak and such a joy to look at in the morning. My Mom's favorite song was "In The Garden" and I so enjoy God's gorgeous creations as I take my morning stroll. I hope you enjoy it too!
Subscribe to:
Posts (Atom)